Complete Pioneer DDJ SB3 Tutorial (Unbox, Connect & Use)
I’ve been using the Pioneer DDJ SB3 for 6 months now and I wanted to create this tutorial for every proud new owner of this beautiful piece of DJ equipment. I can imagine, if you’re a beginner DJ, and you see this controller for the first time, it can be a little overwhelming.
This tutorial will help you get a basic understanding of how the Pioneer DDJ SB3 works, from connecting your DJ controller to your laptop and DJ software to using all the buttons, knobs, and features.
Maybe you’re not a beginner DJ but a little bit more advanced, if have just bought the Pioneer DDJ SB3 controller and would like to know how to use it or have some questions, you’ve come to the right place.
First of all let me say, congratulations on this great purchase. The pioneer DDJ SB3 is, in my opinion, one of the best DJ controllers on the market for beginner DJs. You’ve made a very good choice.
Unboxing the Pioneer DDJ SB3
The most thrilling part of buying any new device really is the unboxing part. I really don’t know exactly why this is, but it feels so good.
When you’ve unboxed your Pioneer DDJ SB3 and the box is complete, you’ll find 3 things in there.
- DDJ-SB3
- USB cable
- Operating Instructions (Quick Start Guide)
Of course DJ controller itself, the USB-Cable, and the operating instructions. If there’s something you can’t find in this tutorial you could have a look in there, maybe you’ll find an answer.
An Explanation of the Layout
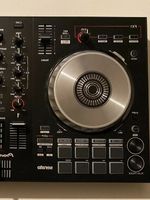
The Pioneer DDJ SB3 looks like this when you have it in front of you.
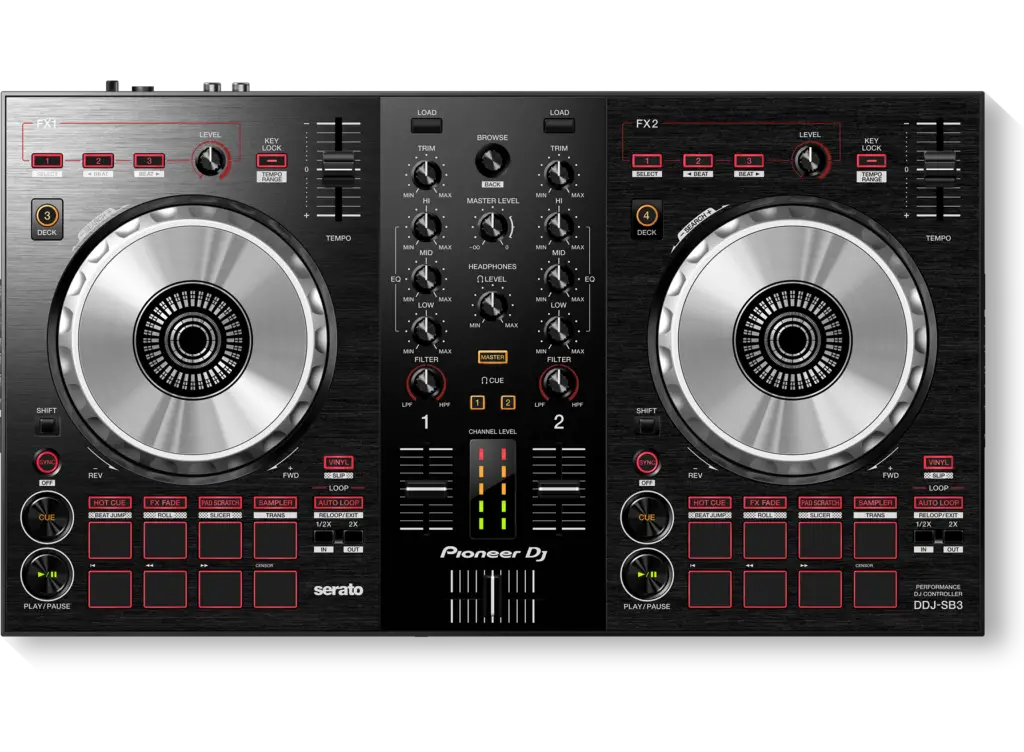
A DJ controller consists of 3 parts. the left, right, and middle.
The left and right sides we call decks. So we have the left deck and the right deck. You can easily spot these decks because each deck contains a jog wheel.
They’re pretty big for such a small controller, but that is a good thing. If you want to learn how to scratch, bigger jog wheels are always better.
The left and the right deck are exactly the same, they’re not even mirrored, they’re just two copies of each other, one on the left and one on the right.
Right in between those two jog wheels you see the middle panel. This part of the DJ controller is used to mix the music that is coming out of deck one and deck two.
There are 2 load buttons at the top and 3 rows of knobs.
The row of knobs with the number 1 below it will correspond to whatever is playing on the left deck, and the row of knobs with the number 2 below it will correspond to the right deck.
The knobs in the middle row have general features that are not assigned to one deck or the other. I’ll talk about the function of those knobs later.
Right below the knobs are 2 volume faders and the crossfader. Again, the volume fader below number one corresponds with the left deck, and the volume fader below number 2 will correspond with the right deck.
The crossfader is used for both decks.
The last thing to mention is the channel level right in between the 2 volume faders. More on that later.
Next up are both the left and right decks. The left and the right deck are an exact match.
In the top right corner:
the FX buttons and the FX level knob, right next to the knob is the key lock button.
Next to the key lock button is the tempo fader to speed up or slow down a song.
Right below the FX buttons:
On the left deck, you can see a button with the number 3 on it. On the right deck, it’s number 4. This button will make it possible for you to play on 4 decks on a 2 channel DJ controller.
Below the jog wheels:
You can find what is called the performance pads; 8 square buttons with various functions.
On the left of the performance, pads are the cue button and the play and pause button.
On the right side of the performance pads:
You can find the all buttons that have to do with loops.
Lastly, there are 3 more buttons:
2 (Shift and Sync) on the left and 1 (Vinyl) on the right side of the performance pads.
What all these buttons, faders, and knobs do, you’ll learn later on in this tutorial. Let’s talk about the next important step.
Setting up your Pioneer DDJ SB3
Connecting the Pioneer SB3 with Your Laptop
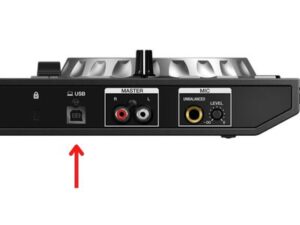
If the box that your Pioneer DDJ SB3 came with, is complete; it should contain a black USB cable that connects your DJ controller to your laptop.
Plug one side into your computer and the other side should go into the back of your DJ controller.
It’s advised that you don’t connect your DJ controller before your laptop has fully booted.
If you’ve done things correctly your DJ controller should light up when you’ve successfully connected it to your laptop.
How to Connect Pioneer SB3 with DJ Software
The Pioneer DDJ SB3 is compatible with Serato DJ Lite and Serato DJ pro.
Serato DJ Lite is free DJ software and I highly recommend you use Serato DJ lite when this is your first DJ controller and you’re a complete beginner when it comes to DJing.
If you know how DJ software works and you’ve been DJing for a little while, you can download Serato DJ pro if you’d like. You can use Serato DJ pro on a trial basis for 14 days, after that you’ll pay $9.99 per month or $149 for a one-time purchase.
You can download Serato DJ lite right here. Make sure you check the system requirements first.
Once you’ve downloaded your preferred DJ software, connecting your Pioneer DDJ SB3 is just a matter of starting your DJ software.
The DJ software (if compatible) will recognize your DJ controller pretty quickly. It should not take longer than a minute.
How to Connect the Pioneer SB3 to Speakers
Now you have a couple of options.
- Let the sound from both decks play through your headphones
- Use your laptop speakers and use your headphone to cue up the next song
- Use external speakers and use your headphone to cue up the next song
- Just using your speakers (I don’t recommend this last one but if you want, it is possible.
I’m going to explain numbers 1, 2 and 3, so you can decide for yourself which one you like to use.
- Letting the sound from both decks come through your headphones
Once your controller is connected and your DJ software is fully booted, plug in your headphone at the front of your DJ controller.
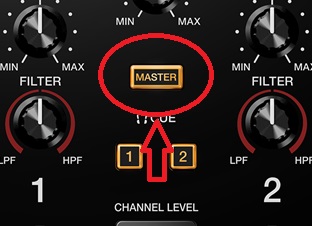
Click on the master button on your DJ controller (see image below). Once you press the master button the button will light up and both the master sound and the cued-up sound will come through your headphones. (It’s a great way to practice if you don’t want your neighbors to complain).
2. Use your laptop speakers and use your headphone to cue up the next song
Once your controller is connected and your DJ software is fully booted, plug in your headphone at the front of your DJ controller you should be good to go for this method.
3. Use external speakers and use your headphone to cue up the next song
Once your controller is connected and your DJ software is fully booted, plug in your headphone at the front of your DJ controller.
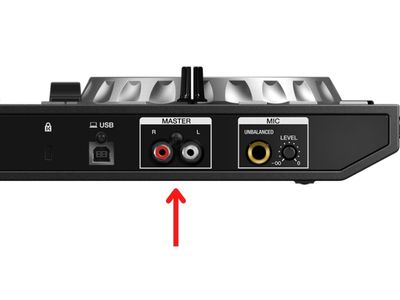
Next, you’ll need a cable that connects your speakers to your DJ controller.
One end of that cable should be able to plug in right here:
The other end of that cable should plug into the back of your speakers. I don’t know a lot about cables, electricity and stuff like that so I can only show you what I’m using. I think they call them RCA male cables (if this is not correct please send me an e-mail so I can correct this!)
I use these Pioneer DJ monitor speakers.

The only thing you have to do now is turn on your speakers and you’re good to go.
How to Use the Pioneer DDJ SB3
This might be the best part of this Pioneer DDJ SB3 tutorial, actually using your DJ controller. Follow along with the steps to get a basic understanding of how your Pioneer DDJ SB3 works.
If you need more guidance on how to learn to DJ, I highly recommend checking out my article where you’ll learn all about the basics of DJing.
Club Ready DJ Schools offers a great free mini course. I recommend you also take a look at their full course.
Let’s start at the beginning: you need to have music uploaded into your DJ software. If you have Serato DJ Lite, here is how you can do that:
When Serato DJ Lite is opened, you can drag and drop your music files into your library, or select the files you want to upload. After you’re done uploading, analyze the files in your music library (You can only do this when your DJ controller is unplugged).
Now that you’ve uploaded music, you can actually start to DJ. Let’s go over the most important features.
Scrolling library
When your DJ controller is connected, you can start to load up your songs on decks 1 and 2. You can do this with your Pioneer DDJ SB3.
In the middle panel at the top, you can find the browser/scroll knob. This knob can either be turned or pressed.
Pressing this knob means Select and turning it left and right is just scrolling through your library.
Try it out and see if you can scroll through your library and find a song you’d like to load up on deck 1.
Loading a song into your DJ deck
When you’ve found the song you’d like to load up on deck 1, press the load button on your DJ controller. The song is now loaded up on deck number 1.
Repeat this process for deck number 2.
Jog wheel
The jog wheel is used for different things.
- to scroll/search through a track
- to scratch
- to drop scratch
I’m not going to explain numbers 2 and 3 because that needs a whole tutorial by itself.
The jog wheel is a very helpful tool to scroll through your song. Spin the jog wheel left and right and see what it feels like. Make sure that the Vinyl mode is turned on. You can do this by pressing the Vinyl button on the lower right side of the jog wheel.
One little tip: when your press the shift button you’ll scroll much faster.
Play, pause, and cue
Another easy step that is pretty self-explanatory but I’m gonna tell you how just for the sake of making this a complete tutorial.
- Play a song: press the play button
- Pause a song: press the play button again
The cue button needs a little explanation. The cue button is used to set a marker on the song on your deck. When the song is playing and your cue marker is set, when you press the cue button it will jump back to that point.
Go ahead and play a song on your left deck and pause the song. Now play that song again, but this time press the cue button. You’ll notice that it jumps right back to where the cue marker was set.
Volume and crossfader
The volume faders can lower or up the volume of the corresponding deck.
The crossfader decides how much of deck 1 or deck 2 comes through. To better understand this, just try it out.
Press play on both decks and switch the crossfader from left to right. When you’re done leave it in the middle so both decks come through equally.
Performance pads
The performance pads have 8 different features:
- Hot cue
- FX fade
- Pad scratch
- Sampler
- Beat jump
- Roll
- Slicer
- Trans
The first 4 can be activated just by pressing the assigned button right above the 8 square performance pads. The last 4 features can be activated by first pressing the shift button on the lower left side of the jog wheel, and then pressing the assigned button.
Tempo faders and key lock
The tempo faders will increase or decrease the BPM of a song, the tempo. Moving it up will slow down a song, moving it down will speed up the song.
With the key lock feature turned on the tone of the music, although speeding up or slowing down, will stay the same.
To understand the key lock better, try to change the BPM of the song with and without the key lock turned on.
FX
The 3 FX buttons on the top left corner of each deck on your DJ controller, corresponds to the FX in Serato DJ Lite. When you activate the FX on you DJ controller, the FX on your Serato DJ Lite software will also be activated.
The 1st, 2nd, and 3rd buttons in the FX section will correspond to the 1st, 2nd, and 3rd FX that is assigned.
The Level knob on the right of the FX buttons will determine the intenseness of the activated FX. This could also mean all 3 of the FX’.
Try and hear the difference in the FX sound when you turn the level knob to the right.
Loop section
There are 3 buttons in the loop section.
Auto loop means setting a loop of a set number of beats. The number of beats can be set by clicking on the left or right arrow right below the auto-loop button.
You can check on your Serato DJ software to see the number of beats it’s set to right now.

You can also set a manual loop by pressing the shift button when a song is playing and then pressing the IN button. Hold the shift button until you reach the end of where you want your loop to end, and press the OUT button.
You’ve now created a manual loop.
Master and headphone volume
On the middle panel, right in between the EQs you can find the volume knobs of the master volume and the volume knob of the volume coming through your headphones.
Headphone cueing
To listen to a song in your headphones press the button with number 1 (left deck) or number 2 (right deck) on it, right in between the filter buttons in the middle panel.
These buttons are also called cue buttons, but these mean cueing the song in your headphones. That’s why you see a headphone symbol right before ” cue”.
Activating decks 3 and 4
Although, if you’re a beginner, you might not want to do this, you have the possibility of playing on a 3rd and 4th deck. You can find the numbers 3 and 4 on the left side of each deck, below the 1st FX button.
Trim, EQ, and filter
All the knobs from top to bottom in the middle panel.
- Trim: another way of lowering the volume, but this time EQ volume
- EQ’s: adjusting the high, mid, and low frequencies of a song
- Filter: turning left filters out low frequencies, to the right filters out high frequencies. Also known as low pass filter and high pass filter.
Sync button
The sync button will match both songs’ BPM. If the song on deck one is playing and you want to match the song’s BPM on deck 2, you press the sync button.
It’s a feature that has been up for discussion for as long as I’ve been DJing. To use or not to use.
Is the Pioneer DDJ SB3 Compatible with Serato DJ Pro
The Pioneer DDJ SB3 is compatible with Serato DJ Pro. After downloading Serato DJ lite, you can sign up for a 14-day free trial of Serato DJ Pro. At the end of the 14-day trial, you can decide to buy Serato DJ Pro on a subscription basis or buy it as a one-time purchase.
That’s it for this Pioneer DDJ SB3 tutorial. Hopefully, I’ve been able to guide you and you’re able to start DJing on this great DJ controller.
If you have any questions please feel free to contact me. You can do this by simply clicking on the contact button on the top menu bar.
